Jack Straw Table.
This table was designed by one of the lead carpenters at Method Construction with one of the managers of Jack Straw, an upscale clothing retailer in Seattle.
The carpenter had drafted a basic set of line drawings with dimensions using an existing slab and table base that I have since lost. I took those drawings and put them into Sketchup, a 3D design program, where I could easily adjust dimensions and get a better sense of the eventual look of the table.

The curved section of the table is the difficult part of this table; I decided to build a form that I would use to vacuum form sheets of MDF.
I sent the drawing to Warmington & North, a cabinet shop located in the Fremont neighborhood of Seattle. Carter Warmington transferred the drawing to a CAD file that he used to cut parts for my form.
 While I could have created a template and cut allthe form parts myself, I was working on other projects and had a limited budget for this one. CNC is very accurate and was more economical than my time would have been.
Once the parts were cut I built a form for the curve.
Glue up can be intense, and I never got around to taking pictures of the vacuum in place. This one especially was exciting. Vacuum creates a lot of pressure. The basics of how it works is that by removing the air from a space, the full weight of the atmosphere exerts itself on the parts. We don’t feel it because the pressure is equalized and we are used to it, but the atmosphere is 14.7 pounds per square inch. This is like when you jump into a pool- you don’t feel the weight of the water just above you, it is fairly evenly distributed all around your body.
The process looks like is: we set up the form, cut the sheet goods to size- in this case the form is wider and longer than it needs to be so the sheet goods don’t extend past the sides. We spread glue on each sheet and stack them up to reach the thickness we need. I was using 1/8” MDF and had 6 sheets to get them to a total of ¾” thick. Once all the sheets are glued, they are placed on the form and one side of the layer of sheets is screwed to the form. Then we pull a thick plastic bag over the whole thing, seal it, and attach a hose that is connected to a vacuum pump.
We have to help push the stack of sheets down onto the form in order to keep them straight, make sure the bag doesn’t twist the form or get stuck between the sheets we are bending and the form as that would create a hump at the sides.
We got the form together, the sheets on, and the vacuum on, everything  seemed good. I was heading to get my camera when I hear this loud explosion! I run to the shop and see that the form has blown in. We had to pull everything apart and rebuild the form with doubled up sheets of ¾” MDF on each side- and added a center support.
The curve is approximately a 3’ tall half circle. That comes out to around 56.5 square inches per side, or 831.27 pounds of force. The MDF just couldn’t take it and imploded with enough force to shatter 2 interior sheets of ¾” MDF. The second attempt worked great.
 I made the drawer box and fit the internal ribs around it, epoxied into place. I used woven fiberglass to reinforce the ribs to give that big “foot” some extra strength. I was worried about what sort of stress that a commercial desk could be subjected to and didn’t want it collapsing after someone decided to climb on top of it for some reason.
As you can see, the inside cover was epoxied into place and sheets of fiberglass reinforcement added.
The drawer box was built and veneered prior to placement. Much care was required to keep epoxy off the veneer surfaces.
This picture shows the outer surface being glued into place. Lots of clamps and lots of epoxy! If you look at the ribs, there is one missing on the front. This is the side has a bank of drawers.
 Here is the piece with the outer layer of the curve installed. You can see we screwed the center to the ribs. I was worried about getting enough pressure to push the panel onto the ribs over that distance, and as the piece was getting painted I could fill those holes.
The top and bottom sheets were fitted,creating a torsion box of the table. I filled all the screw holes with thickened epoxy and coated the entire table with a thinned epoxy designed to penetrate the MDF. This soaks into the MDF giving it a uniform, hard surface that also reduces the chance of standing water causing any damage.
 Paint was a long, tedious process. I used “Nuwave White Water Based Lacquer” from Rudd, a good local coatings manufacturer. This is a nice product, water based which means that it requires fewer chemicals and doesn’t off-gas toxic fumes. The Oak was finished with the same product in a clear satin.

The oak drawers miter into the corner, creating a seamless look.

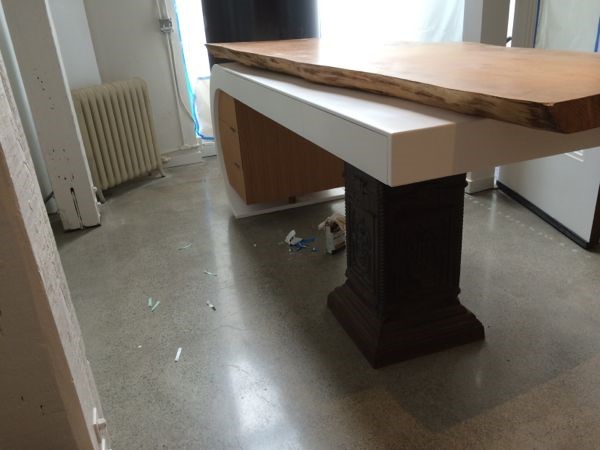
The completed table with slab mounted on top. To install the slab I drilled holes in 4 spaces to fasten through the top of the table. This allows the fasteners to be hidden, but also allowed the holes to be over-sized so that the slab could move without cracking or destroying the table below it. The slab had a bit of a twist to it, but that is also part of the charm of the wood.
You must be logged in to post a comment.